Canvas Panel in WPF
WPF contains five different panels which are used to create layouts. Those are Canvas, StackPanel, WrapPanel, DockPanel, and Grid. These built-in panels are used to avoid layout pitfalls for different resolutions. All these panels are derived from System.Windows.Controls namespace. In this article we discuss about Canvas panel.
Canvas is the most basic panel which supports only classic notion of positioning elements. We can position the elements in Canvas by using Left, Right, Top, and Bottom attached properties. By setting these properties we can position the elements to the edge of Canvas. Let’s discuss about Canvas with simple example.
Open Microsoft Visual Studio 2013 => Create WPF application and change the code of MainWindow.xaml to below.
<Window x:Class="WPFCanvas.MainWindow"
xmlns="http://schemas.microsoft.com/winfx/2006/xaml/presentation"
xmlns:x="http://schemas.microsoft.com/winfx/2006/xaml"
Title="MainWindow" Height="350" Width="525">
<Canvas>
<Rectangle Canvas.Left="20" Canvas.Top="20" Width="50" Height="50" Fill="Blue" />
<Rectangle Canvas.Left="20" Canvas.Bottom="20" Width="50" Height="50" Fill="Red" />
<Rectangle Canvas.Right="20" Canvas.Top="20" Width="50" Height="50" Fill="Green" />
<Rectangle Canvas.Right="20" Canvas.Bottom="20" Width="50" Height="50" Fill="Silver" />
</Canvas>
</Window>
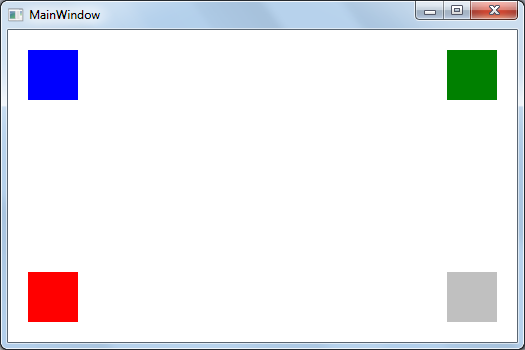
As shown above we placed the four Rectangle objects in Canvas panel by assigning Canvas.Left & Canvas.Top properties to first Rectangle, Canvas.Left & Canvas.Bottom properties to second Rectangle, Canvas.Right & Canvas .Top properties to third Rectangle, and Canvas.Right & Canvas.Bottom properties to fourth Rectangle.
Run the application and the output is as shown below. The four Rectangle boxes are arranged into each corner of Canvas panel.
In Canvas panel, we cannot set HorizontalAlignment & VerticalAlignment because elements are given only the exact space they need. We can apply LayoutTransform but differs with RenderTransform because with LayoutTransform elements always remain the specified distance from the selected corner of the Canvas.
Note: If we use the Canvas.Left & Canvas.Right attached properties simultaneously, Canvas.Right gets ignored and elemen will set to Canvas.Left. In the same way we set the Canvas.Top & Canvas.Bottom attached properties simultaneously, only Canvas.Bottom gets ignored and element will set to Canvas.Top. So we should not use Canvas.Left & Canvas.Right at once and Canvas.Top & Canvas.Bottom at once.
Canvas has one more attached property ZIndex which defines element order to display.
<Window x:Class="WPFCanvas.MainWindow"
xmlns="http://schemas.microsoft.com/winfx/2006/xaml/presentation"
xmlns:x="http://schemas.microsoft.com/winfx/2006/xaml"
Title="MainWindow" Height="350" Width="525">
<Canvas>
<Rectangle Canvas.ZIndex="1" Canvas.Left="20" Canvas.Bottom="20" Width="50" Height="50" Fill="Blue" />
<Rectangle Canvas.ZIndex="2" Canvas.Left="20" Canvas.Bottom="20" Width="50" Height="50" Fill="Red" />
</Canvas>
</Window>
In the above code we have the two Rectangles with Canvas Left and Bottom properties but differs in ZIndex value. Here we given ZIndex value as 1 for first Rectangle and 2 for second Rectangle. So if you run the application second Rectangle element displays on first Rectangle because second element ZIndex is more as compared with the first Rectangle element.
Even though Canvas is basic panel, it is very light weight panel. So we can use this panel where performance is very critical especially while working with primitive shapes in vector based drawings.
