Content Approval in Sharepoint 2010
For example in a company Sharepoint web site we have document library and employees of a company uploads the documents for their manager’s approvals. In this article we discuss about how to create the document library to Approve/Reject its documents.
Open Sharepoint Web Application, Go to Site Actions and select New Document Library Option as shown below to create the document library.

As shown below enter Name, Description and select Microsoft Excel spreadsheet from Document Template drop down list to create document Library.

My Document Library is created and display as shown below.

Now we need to customize the My Document Library to add Approve/Reject settings. Go to Site Actions => Site Settings => select “Site libraries and lists” under “Site Administration”. Now select customize “My Document Library” as shown below.

Select “Versioning Settings” from General Settings as shown below.

Select “Yes” for Require content approval for submitted items? Option as shown below and Click OK button.

Now you can find new column “Approval Status” in My Document Library as shown below with “Pending” status.

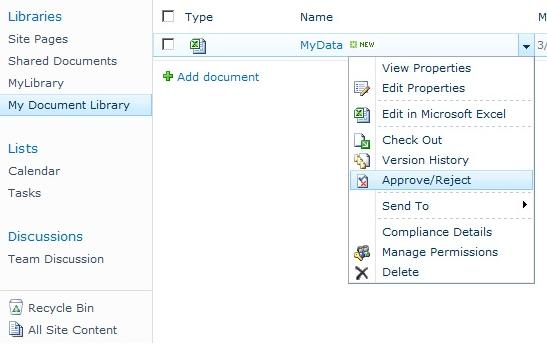
Now add any document, right click on that document and select Approve/Reject option as shown below.

Select “Approved. This item will become visible to all users” option as shown below to approve any document.

Status of “Approved Status” changed to Approved as shown below for selected document.

Latest TechTips
Latest Posts
Categories
- AngularJS (7)
- Asp.Net (231)
- Asp.Net Core (4)
- Asp.Net MVC (55)
- Asp.Net Web API (32)
- AZ-204 Certificate (2)
- Blazor (15)
- C#.Net (449)
- Cryptography (9)
- Entity Framework Core (2)
- General (13)
- Git (5)
- IIS (5)
- JavaScript (6)
- jQuery (28)
- LINQ (10)
- Microsoft Azure (35)
- Microsoft Excel (2)
- Microsoft Office (42)
- Microsoft Promo Code (16)
- Oracle (2)
- Sharepoint (21)
- Silverlight (3)
- SQL Server (12)
- Terraform (3)
- Vb.Net (8)
- WCF (19)
- WPF (18)
- Xamarin (10)
- XML (4)
