Set the Control Position in WPF
In this article we discuss about how to set the child controls position within the parent control in WPF. As part of this article we will discuss about control alignment, content alignment and control flow direction.
Control Alignment:
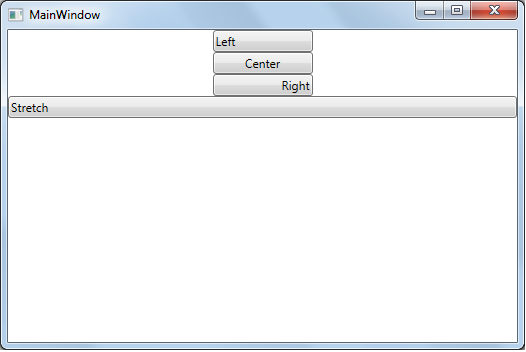
There are two alignments we have to set the control position in WPF, those are HorizontalAlignment and VerticalAlignment. As its name represents by using HorizontalAlignment, we can set the control position horizontally and by using VerticalAlignment, we can set the control position vertically. HorizontalAlignment takes the values as Left, Center, Right, and Stretch; VerticalAlignment takes values as Top, Center, Bottom, and Stretch.
As shown below we are assigning four button controls horizontally with different values such each one is Left, Center, Right, and Stretch.
Open Microsoft Visual Studio 2013 => Create WPF Application and write below code.
<Window x:Class="WPFSizePosition.MainWindow"
xmlns="http://schemas.microsoft.com/winfx/2006/xaml/presentation"
xmlns:x="http://schemas.microsoft.com/winfx/2006/xaml"
Title="MainWindow" Height="350" Width="525">
<StackPanel>
<Button HorizontalAlignment="Left" Content="Left" Width="100"></Button>
<Button HorizontalAlignment="Center" Content="Center" Width="100"></Button>
<Button HorizontalAlignment="Right" Content="Right" Width="100"></Button>
<Button HorizontalAlignment="Stretch" Content="Stretch"></Button>
</StackPanel>
</Window>
If you run the code, the output is as shown below.

As shown above stretch element occupying the full parent element width.
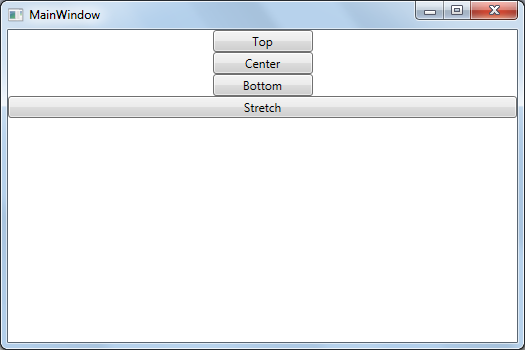
Now align elements vertically with same four buttons each one is for Top, Center, Bottom, and Stretch as shown below.
<Window x:Class="WPFSizePosition.MainWindow"
xmlns="http://schemas.microsoft.com/winfx/2006/xaml/presentation"
xmlns:x="http://schemas.microsoft.com/winfx/2006/xaml"
Title="MainWindow" Height="350" Width="525">
<StackPanel>
<Button VerticalAlignment="Top" Content="Top" Width="100"></Button>
<Button VerticalAlignment="Center" Content="Center" Width="100"></Button>
<Button VerticalAlignment="Bottom" Content="Bottom" Width="100"></Button>
<Button VerticalAlignment="Stretch" Content="Stretch"></Button>
</StackPanel>
</Window>
If you run the code it displays output as below.
Control Content Alignment:
We can adjust the control content by using HorizontalContentAlignment and VerticalContentAlignment. As shown below we can set the content by using HorizontalContentAlignment.
<Window x:Class="WPFSizePosition.MainWindow"
xmlns="http://schemas.microsoft.com/winfx/2006/xaml/presentation"
xmlns:x="http://schemas.microsoft.com/winfx/2006/xaml"
Title="MainWindow" Height="350" Width="525">
<StackPanel>
<Button HorizontalContentAlignment="Left" Content="Left" Width="100"></Button>
<Button HorizontalContentAlignment="Center" Content="Center" Width="100"></Button>
<Button HorizontalContentAlignment="Right" Content="Right" Width="100"></Button>
<Button HorizontalContentAlignment="Stretch" Content="Stretch"></Button>
</StackPanel>
</Window>
Run the application, the output as shown below.
Set the content using VerticalContentAlignment as shown below.
<Window x:Class="WPFSizePosition.MainWindow"
xmlns="http://schemas.microsoft.com/winfx/2006/xaml/presentation"
xmlns:x="http://schemas.microsoft.com/winfx/2006/xaml"
Title="MainWindow" Height="350" Width="525">
<StackPanel>
<Button VerticalContentAlignment="Top" Content="Top" Width="100"></Button>
<Button VerticalContentAlignment="Center" Content="Center" Width="100"></Button>
<Button VerticalContentAlignment="Bottom" Content="Bottom" Width="100"></Button>
<Button VerticalContentAlignment="Stretch" Content="Stretch"></Button>
</StackPanel>
</Window>
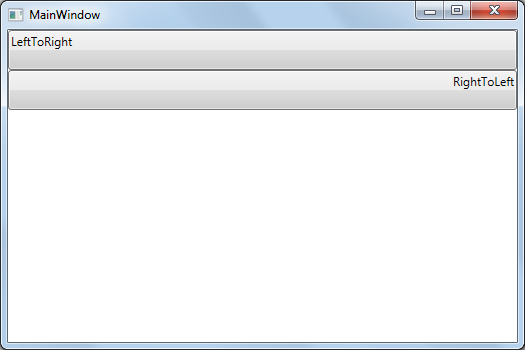
Control FlowDirection:
By using the FlowDirection property we can set the inner content flow from LeftToRight and RightToLeft. As shown below we are setting the first button content from LeftToRight and second button content from RightToLeft as shown below.
<Window x:Class="WPFSizePosition.MainWindow"
xmlns="http://schemas.microsoft.com/winfx/2006/xaml/presentation"
xmlns:x="http://schemas.microsoft.com/winfx/2006/xaml"
Title="MainWindow" Height="350" Width="525">
<StackPanel>
<Button FlowDirection="LeftToRight" HorizontalContentAlignment="Left" VerticalContentAlignment="Top" Height="40">LeftToRight</Button>
<Button FlowDirection="RightToLeft" HorizontalContentAlignment="Left" VerticalContentAlignment="Top" Height="40">RightToLeft</Button>
</StackPanel>
</Window>
Execute the application, it displays below output.