WrapPanel in WPF
WrapPanel also same as StackPanel will arrange elements in Vertical or Horizontal manner, only difference is WrapPanel arranges elements in extra rows or columns if there is no enough space. WrapPanel also doesn’t have any attached properties and it has Orientation property to set elements Vertical or Horizontal manner, but default value for WrapPanel Orientation property is Horizontal unlike StackPanel.
Let’s discuss about WrapPanel with example. Open Microsoft Visual Studio 2013 and Create WPF application, Change MainWindow.xaml code to below.
<Window x:Class="WPFWrapPanel.MainWindow"
xmlns="http://schemas.microsoft.com/winfx/2006/xaml/presentation"
xmlns:x="http://schemas.microsoft.com/winfx/2006/xaml"
Title="MainWindow" Height="350" Width="525">
<WrapPanel>
<Button Background="Red">Red</Button>
<Button Background="Green">Green</Button>
<Button Background="Yellow">Yellow</Button>
<Button Background="Black">Black</Button>
<Button Background="Blue" Height="50" Width="300">Blue</Button>
<Button Background="Brown" Height="50" Width="300">Brown</Button>
</WrapPanel>
</Window>
As shown in the code, we didn’t provided any value for WrapPanel Orientation property so it takes default value Horizontal. Run the application, it displays output as below.
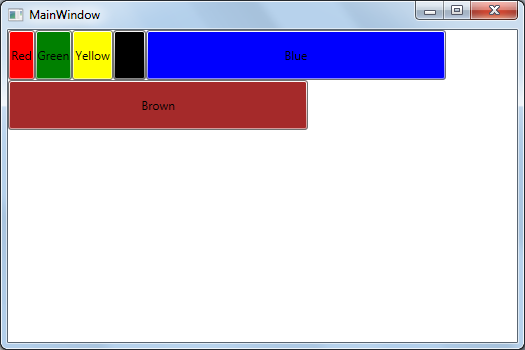
As shown in the output, Brown button is displaying in the next row because screen width is not enough to display. If you increase the width Brown button will move to first row only, if decreases further other elements also will form extra rows.
We can arrange elements vertically also in WrapPanel by changing the Orientation property value to Vertical as shown below.
<Window x:Class="WPFWrapPanel.MainWindow"
xmlns="http://schemas.microsoft.com/winfx/2006/xaml/presentation"
xmlns:x="http://schemas.microsoft.com/winfx/2006/xaml"
Title="MainWindow" Height="350" Width="525">
<WrapPanel Orientation="Vertical">
<Button Background="Red">Red</Button>
<Button Background="Green">Green</Button>
<Button Background="Yellow">Yellow</Button>
<Button Background="Black">Black</Button>
<Button Background="Blue" Height="200" Width="300">Blue</Button>
<Button Background="Brown" Height="200" Width="300">Brown</Button>
</WrapPanel>
</Window>
Run the application and the output displays as shown below.
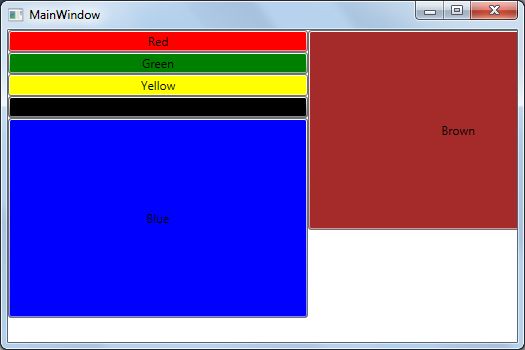
Here also Brown button is displaying in extra column because of there is no sufficient height to fit in one column. If we increases the window height Brown button will come first column only, if decreases remaining buttons also will form extra columns.
WrapPanel has two more properties ItemHeight and ItemWidth. By using ItemHeight and ItemWidth we can control elements height, width. Any element which contains more height than ItemHeight will get clipped its height and it is same for ItemWidth also, any element contains more width than ItemWidth will get clipped its width. We can apply LayoutTransform and RenderTransform for WrapPanel also as we do for StackPanel.
